Norm-in-Norm Loss with Faster Convergence and Better Performance for Image Quality Assessment

Description
LinearityIQA code for the following paper:
- Dingquan Li, Tingting Jiang, and Ming Jiang. Norm-in-Norm Loss with Faster Convergence and Better Performance for Image Quality Assessment. In Proceedings of the 28th ACM International Conference on Multimedia (MM ’20), October 12-16, 2020, Seattle, WA, USA. [arxiv version]

How to?
Install Requirements
conda create -n reproducibleresearch pip python=3.6
source activate reproducibleresearch
pip install -r requirements.txt -i https://pypi.tuna.tsinghua.edu.cn/simple > install_0.log
git clone https://github.com/NVIDIA/apex.git
cd apex
# source switch_cuda.sh 10.2 # [optional] if your cuda version for torch is 10.2
pip install -v --no-cache-dir --global-option="--cpp_ext" --global-option="--cuda_ext" ./ > install.log
cd ..
rm -rf apex
# source deactive
Note: Please install apex from the source. I installed the apex from the source (by following the README.md), and pip freeze > requirements.txt shows that apex version I used is 0.1. Make sure that the CUDA version is consistent. If you have any installation problems, please find the details of error information in *.log file, e.g., if the cuda versions are not consistent between apex and torch, one can use switch-cuda.sh to solve it.
Download Datasets
Download the KonIQ-10k and CLIVE datasets. Here is an alternative link with password 9pwl. Then, run the following ln commands in the root of the repo.
cat your_downloaded_path/KonIQ-10k.tar.gz* | tar -xzf - # your_downloaded_path is your path to the downloaded files for KonIQ-10k dataset
upzip your_downloaded_path/CLIVE(IQA).zip # your_downloaded_path is your path to the downloaded files for CLIVE dataset
ln -s koniq10k/images/ KonIQ-10k
ln -s ChallengeDB_release/Images/ CLIVE
Training on KonIQ-10k
CUDA_VISIBLE_DEVICES=0 python main.py --dataset KonIQ-10k --resize --exp_id 0 -lr 1e-4 -bs 8 -e 30 --ft_lr_ratio 0.1 -arch resnext101_32x8d --loss_type norm-in-norm --p 1 --q 2 > exp_id=0-resnext101_32x8d-p=1-q=2-664x498.log 2>&1 & # The saved checkpoint is copied and renamed as "p1q2.pth".
CUDA_VISIBLE_DEVICES=1 python main.py --dataset KonIQ-10k --resize --exp_id 0 -lr 1e-4 -bs 8 -e 30 --ft_lr_ratio 0.1 -arch resnext101_32x8d --loss_type norm-in-norm --p 1 --q 2 --alpha 1 0.1 > exp_id=0-resnext101_32x8d-p=1-q=2-alpha=1,0.1-664x498.log 2>&1 & # The saved checkpoint is copied and renamed as "p1q2plus0.1variant.pth"
More options can be seen by running the help command python main.py --help.
Visualization
tensorboard --logdir=runs --port=6006 # --host your_host_ip; in the server (host:port)
ssh -p port -L 6006:localhost:6006 user@host # in your PC. See the visualization in your PC
You can download our checkpoints with a password 4z7z (Alternative way: Google Drive). Then paste it to checkpoints/.
Note: We do not set drop_last=True where we obtained our results in the paper. However, if the the size of training data % batch size == 1, the last batch only contains 1 sample, one needs to set drop_last=True when prepare the train_loader in line 86-90 of IQAdataset.py. For example, if 80% images of CLIVE are considered as the training data, and the batch size is 8, then based on 929 % 8 == 1, you will have to set drop_last=True. Otherwise, you will get an error in 1D batch norm layer.
Testing
Testing on KonIQ-10k test set (Intra Dataset Evaluation)
CUDA_VISIBLE_DEVICES=0 python test_dataset.py --dataset KonIQ-10k --resize -arch resnext101_32x8d --trained_model_file checkpoints/p1q2.pth
CUDA_VISIBLE_DEVICES=1 python test_dataset.py --dataset KonIQ-10k --resize -arch resnext101_32x8d --trained_model_file checkpoints/p1q2plus0.1variant.pth
Testing on CLIVE (Cross Dataset Evaluation)
CUDA_VISIBLE_DEVICES=0 python test_dataset.py --dataset CLIVE --resize -arch resnext101_32x8d --trained_model_file checkpoints/p1q2.pth
CUDA_VISIBLE_DEVICES=1 python test_dataset.py --dataset CLIVE --resize -arch resnext101_32x8d --trained_model_file checkpoints/p1q2plus0.1variant.pth
Test Demo
CUDA_VISIBLE_DEVICES=0 python test_demo.py --img_path data/1000.JPG --resize -arch resnext101_32x8d --trained_model_file checkpoints/p1q2.pth
# > The image quality score is 10.430044178601875
CUDA_VISIBLE_DEVICES=1 python test_demo.py --img_path data/1000.JPG --resize -arch resnext101_32x8d --trained_model_file checkpoints/p1q2plus0.1variant.pth
# > The image quality score is 16.726127839961094
Remark
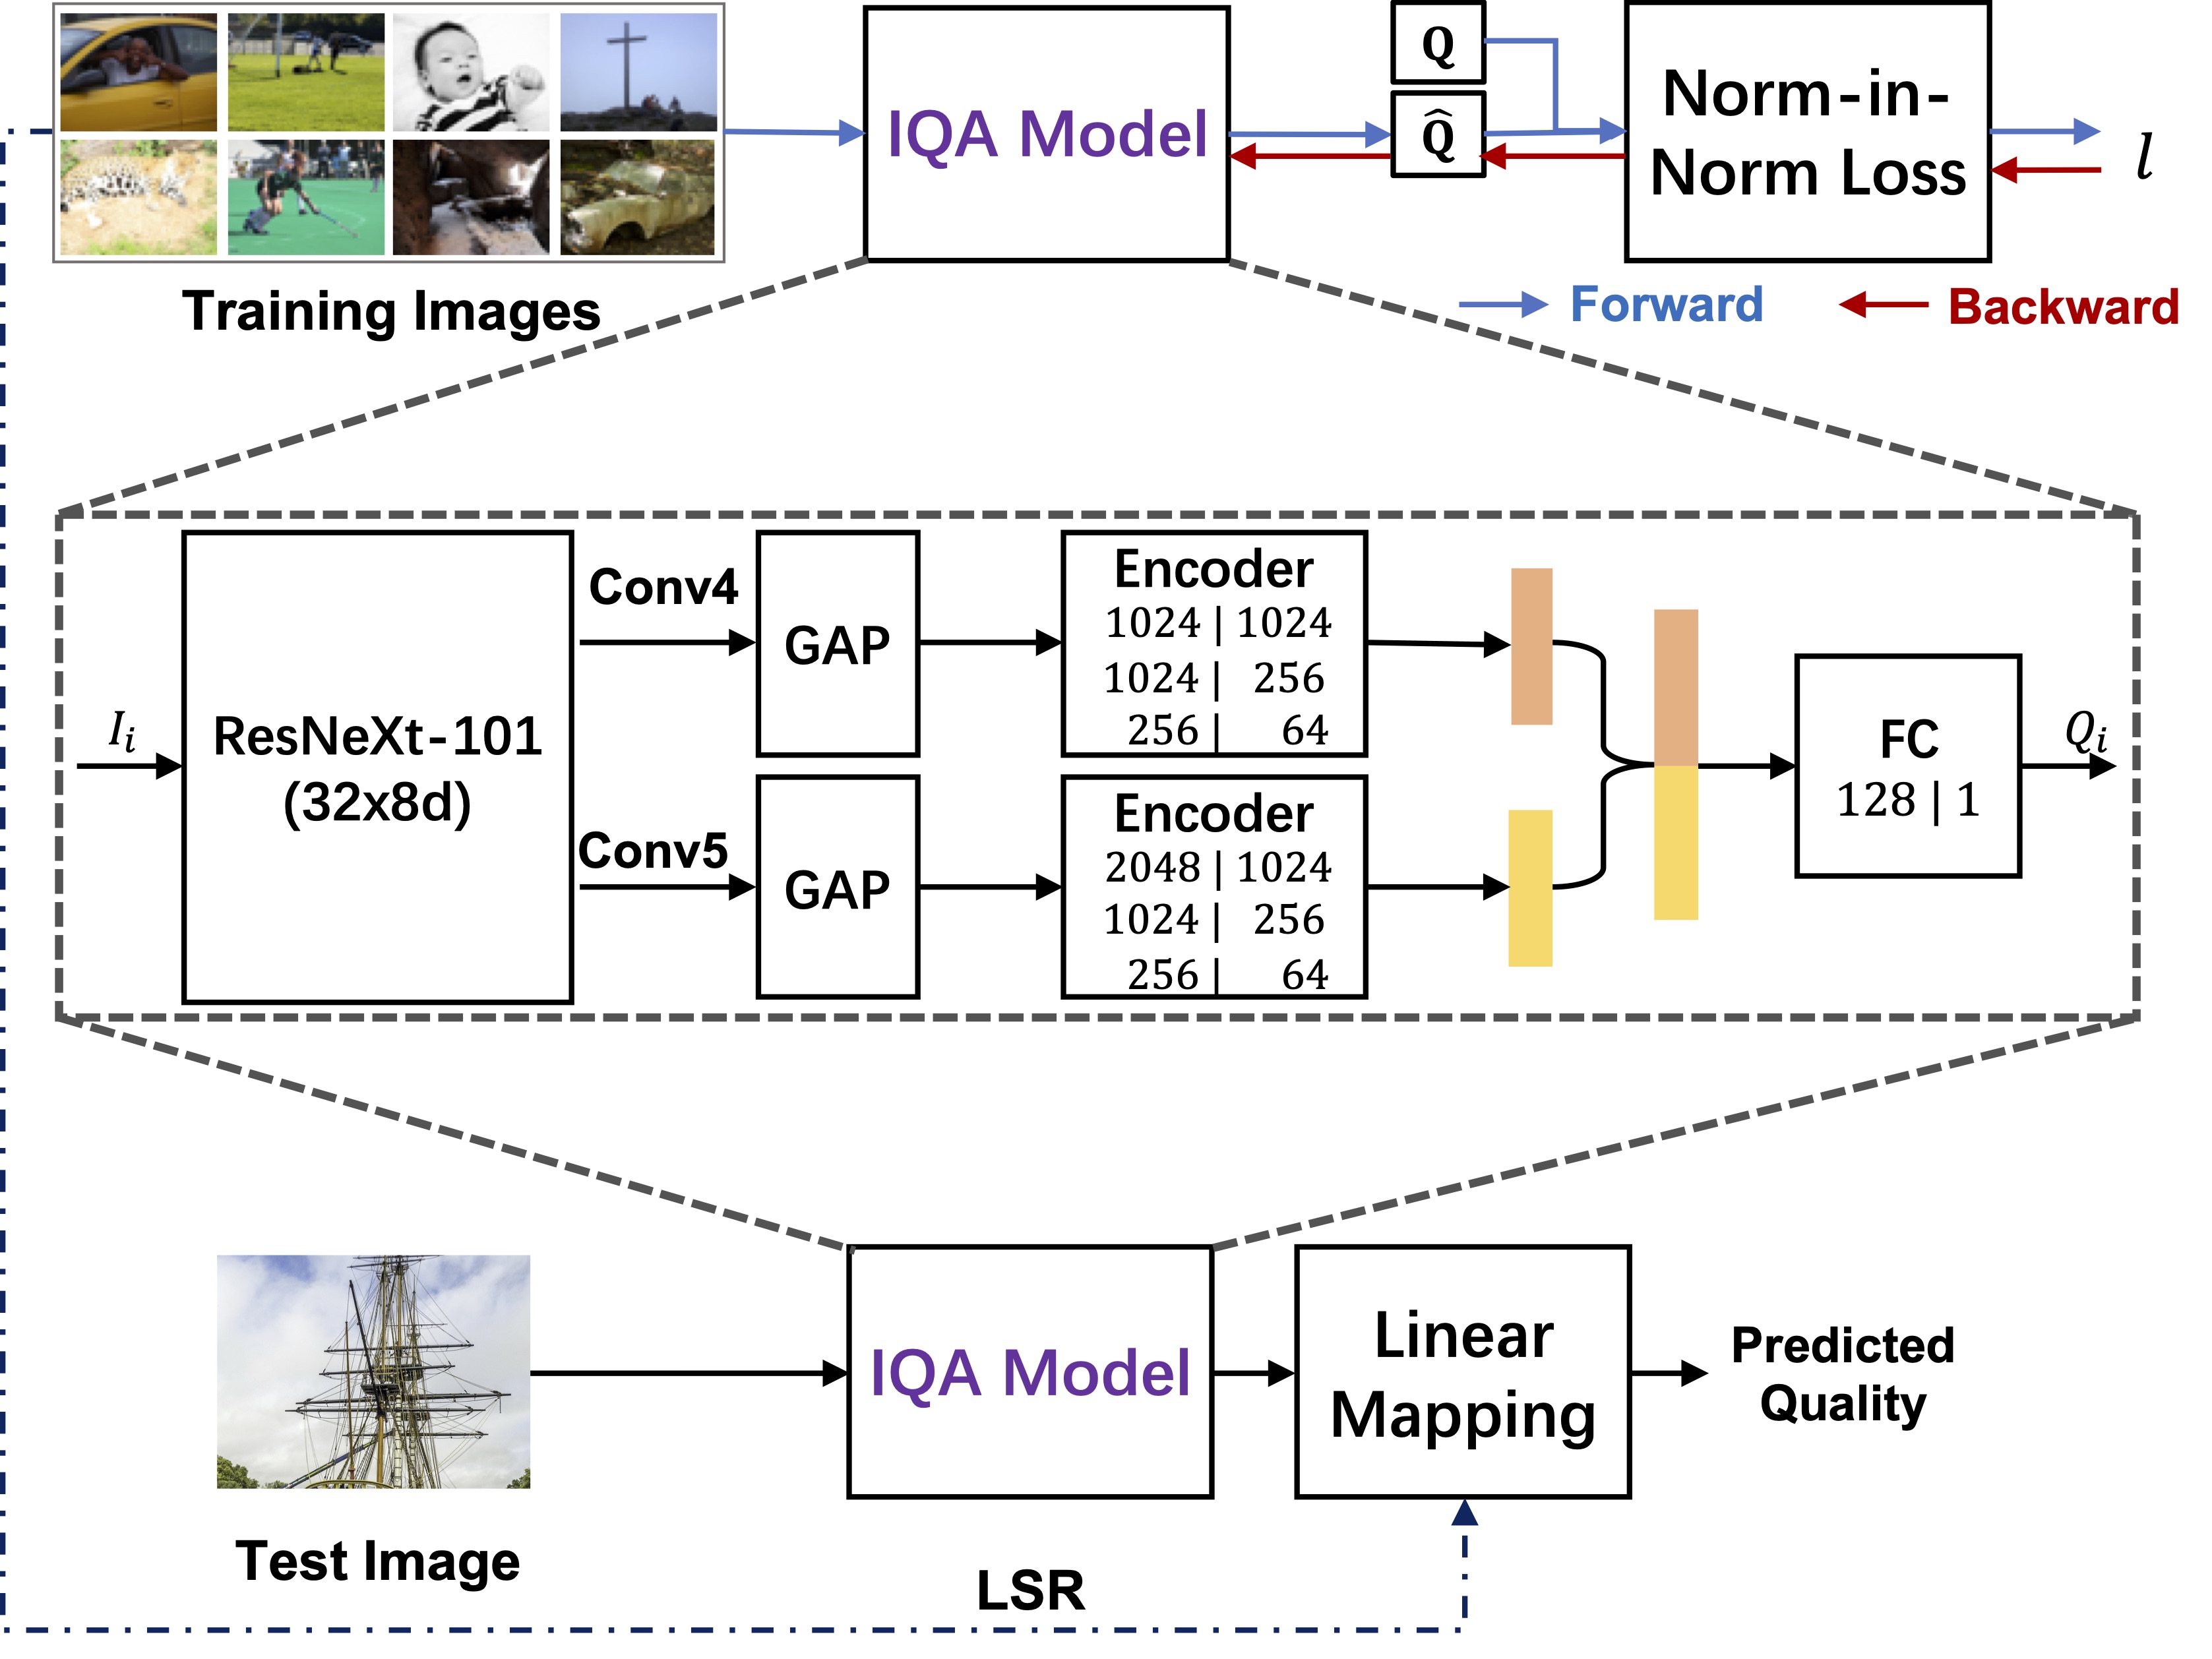
If one wants to use the “Norm-in-Norm” loss in his project, he can refer to the norm_loss_with_normalization in IQAloss.py.
If one wants to use the model in his project, he can refer to the IQAmodel.py.
Contact
Dingquan Li, dingquanli AT pku DOT edu DOT cn.